
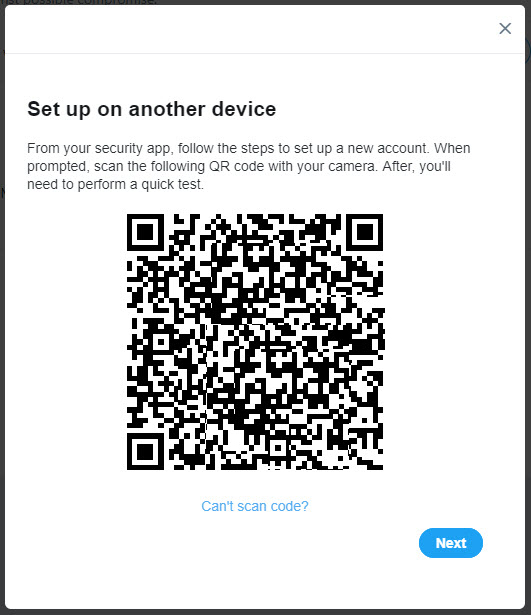
To add an account to Google Authenticator, open the app on your phone and press the plus button. From there, scan the QR code or enter the secret key displayed on the website. You can also change the account name if you wish. Follow the on-screen instructions to verify that the code is working. Once the process is complete, you’ll need to enter a 6-digit code in addition to your login and password to access your account.
Below is a step-by-step instruction.
- Open the Google Authenticator app on your phone and tap the plus button.
- Scan the QR code or manually enter the secret key displayed on the website.
- Optionally, you can change the account name to something more recognizable.
- Follow the instructions on your screen to verify that the code is working.
- Once you’ve completed the setup process, you’ll need to enter a 6-digit code in addition to your login credentials to access your account.
Although two-factor authentication apps like Google Authenticator offer excellent security, not all services make it simple to find and enable this feature. In this blog post, I will guide you through the steps to enable two-step verification on your Google Account, which will also secure your Gmail email, and we will explore other multi-step verification methods offered by Google.
By the way, did you know that the 1Password has an Authenticator application built into it that will automatically populate the 2FA codes for you on the login page both on your computer and the mobile browser?
I have been using 1Password for over three years now, and I cannot overstate how much I like this Password Manager. You can try 1Password for free for 14 days or visit the 1Password website for more information.
If you’re worried about losing access to your accounts, I also discuss the importance of saving backup codes and the steps to take if you lose your phone with Google Authenticator on it.
2-Step Verification – Options.
Google has it all, and you can choose the method you like the most. I guess that the 2-Step Verification using Google Authenticator app is the most popular one, but explore other options available to you, like securing your account with YubiKey Security Key.
Here are the different Two-Factor Authentication options offered by Google:
- Google Authenticator app, Authy, Duo Mobile, or Microsoft Authenticator.
- Voice or text message.
- Google prompts.
- Backup codes.
- Security key (hardware-based authentication – I’m using YubiKey 5C NFC).
Note that you need to generate a verification token for each method every time you log in, except for the Security Key option, where you insert the key into the USB port. I would also recommend avoiding phone calls and text message authentication methods.
How to add an account to Google Authenticator?
Your email account is associated with a service that provides a mailbox for you. To add your email account to the Google Authenticator app and ensure its security, you need to secure the account of the service where your email is hosted. In this example, I will show you how to secure my Gmail account hosted by Google with Google Authenticator.
Activating 2-Step Verification using Google Authenticator.
- Go to – https://myaccount.google.com/security.
- Sign in to your Google account.
- Select ‘2-Step Verification’ under the Signing into Google section.
- Click ‘Get Started’ and follow the instructions.
- Type your phone number and press ‘Send’.
- Confirm the code and press ‘Next’.
- Finally, click ‘Turn On’.
Below is a handy video tutorial I have created.
How to Add Another Account to Google Authenticator?
The process of adding another account to Google Authenticator is similar, if not the same, as setting up your Google account. First, visit the website of the service you want to add, login, and set up two-factor authentication (2FA). Next, use the app to scan the QR code, confirm the code generated by the app, and be sure to save your Backup Codes in a secure location.
Disable Voice or Text Message Authentication.
But we are not finished yet. When setting up Two-Factor Authentication on a Google account, Google prompt is a default option, followed by Voice or text message authentication, which I don’t recommend using.
So let’s change this.
- Scroll down until you find the ‘Authenticator app’ option.
- Click on it to start the process and follow the instructions on the screen.
- Once set up, press the arrow back to return to the ‘Security’ section.
Now that we have set up the Two-Factor authentication using the Google Authenticator app, we can remove the Voice or text message authentication.
- Find the ‘Voice or text message’ option and click on it to start the process.
- Click the Recycling icon next to your phone number to remove this authentication method.
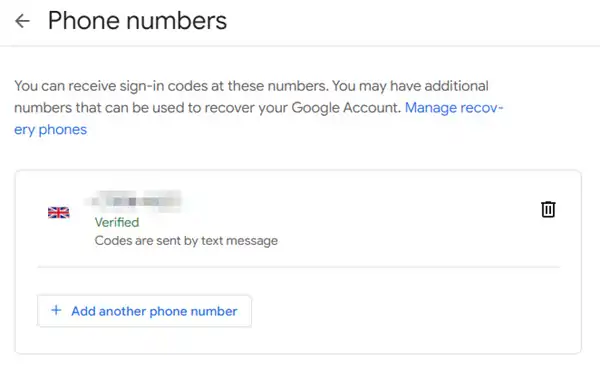
You should now be able to log in to your Google account using your login credentials and the TOTP code generated by the Google Authenticator app.
Saving Backup Codes.
Backing up your codes is essential as it allows you to regain access to your account in the event that your phone is lost. It’s important to copy the codes and keep them in a secure location. I also highly suggest reading my other article, which goes into detail about what backup codes are and why it’s critical to store them safely.
Google will now generate ten blocks of 8-digit long backup codes for you. It is crucial that you keep them in a safe place. You need the Backup Codes if you get locked out of your account.
Saving your backup codes:
- Find and click the ‘Backup codes’ section.
- Confirm your account password.
- Click the ‘Get backup codes’ option.
- Copy or download your backup codes.
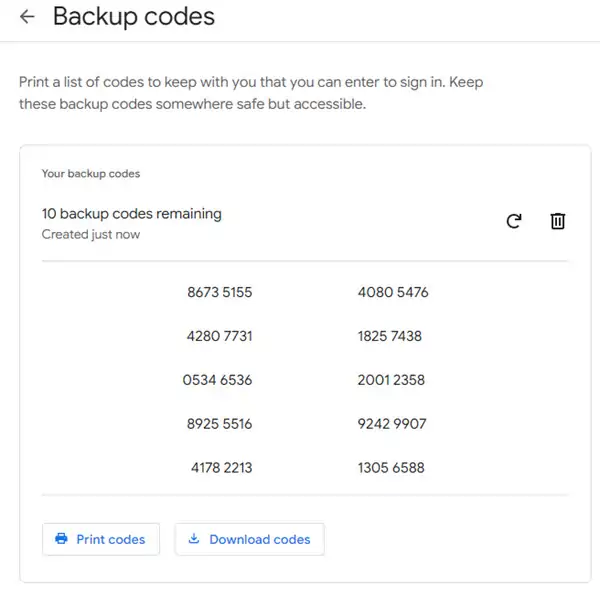
You can use each backup code only once and generate the new block anytime.
Two-Step Verification – Availability.
Of course, Google is not the only service that offers Two-Step Verification (also known as Two-Factor Authentication). It’s worth checking if your other accounts provide this feature.
To save time, I have found a helpful website you can use called 2fa.directory. It’s a great resource that can quickly identify which of your accounts offer not only Two-Factor Authentication but also any other type of second-step verification.
FAQ.
How to add email to Google Authenticator?
Your email account is provided by a service that offers a mailbox for you to use. To enhance the security of your email account and add it to the Google Authenticator app, you will need to secure the account of the service where your email is hosted. For example, Google hosts your Gmail account, and securing your Google account with two-factor authentication (2FA) will also secure your email account.
Is Google Authenticator tied to a Sim Card?
The app doesn’t rely on your phone number or SIM card but instead uses the time on your device to generate codes. This means that you can use the Google Authenticator app even if you don’t have a phone number or SIM card associated with your device. However, you may need an internet connection to download the app and to set up the accounts you want to protect with 2FA.
Add an account to Google Authenticator without a QR Code.
If you are unable to scan a QR code, you can still add an account to Google Authenticator. Look for the “Can’t scan code” or a similar option, typically located below the QR code generated by the service. By clicking this option, you will see a Setup Key (Secret Key) that can be manually entered into Google Authenticator. To enter the Setup Key, choose the “Enter a setup key” option in the Google Authenticator app instead of “Scan a QR code.”
Before you go…
Setting up Two-Factor Authentication may not be as difficult as you think. While the process for enabling this security feature may vary slightly depending on the service, the Security section in your account settings is usually a good starting point to find it.
But have you considered how to transfer your 2FA codes to a new device? As your phone ages, you may eventually want to upgrade or reset it to factory settings to improve its performance. In such cases, you’ll need to know how to transfer your 2FA codes to the new device.