
Not everyone who uses a Password Manager is comfortable with the fact that only a single master password is often required to gain access. Fortunately, the developers behind the most popular Password Managers were already aware of that issue, and new additional authentication methods were added to improve the safety of your data.
Most reputable Password Managers can secure your account with Two-Factor Authentication, which typically means using an Authenticator app like Google Authenticator to generate the 6-digit TOTP code.
However, today I will focus on a more advanced authentication method and a handful of Password Managers that support it.
The U2F or Universal Second Factor relies on the account owner to authenticate using a Hardware Security Key by either inserting the key into the USB port and touching it or using the Near-Field Communication protocol to authenticate wirelessly on a device that supports the NFT.
The Yubico company produces one of the most popular and trusted Hardware Security Keys called YubiKey, and below is the list of Password Managers that work with YubiKey.
The following Password Managers work with YubiKey.
- LastPass
- 1Password (Online account only)
- Dashlane
- Bitwarden
- Keeper
All Password Managers from the list above except one will work with YubiKey when unlocking the desktop application and the browser extension installed on your computer.
The exception is 1Password, where only the 1Password.com online account works with the YubiKey. The desktop application and the browser extension will still rely on the master password, pin, or biometric unlock if using the mobile device.
I wanted to give you some advice here; make sure to register a minimum of two YubiKeys, just in case your primary one has been lost.
If you don’t have the YubiKey yet, I would recommend my favorite, YubiKey 5C NFC, a very versatile Security Key with the latest USB-C and NFC technology, allowing you to use with your NFC-enabled devices just by tapping it.
If you are an Apple user, the YubiKey 5Ci is the best next choice, in my opinion.
You may also like: Should I buy a YubiKey Security Key?
But for now, let’s see how we can set up the YubiKey with every Password Manager from the list above.
Setting LastPass to work with YubiKey.
Although I prefer and have been using 1Password for over three years now, the LastPass is admittedly the most popular Password Manager. Adding YubiKey to LastPass takes only a few minutes, and it will dramatically improve the security of your account.
You can visit the LastPass website to check the plans they currently have available.
1) Log in to your LastPass account.
Click the LastPass extension in your browser and press the Open My Vault option to open the account in the browser.
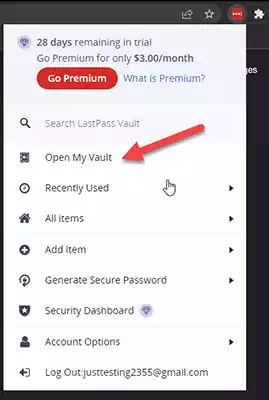
Under your account login, select Account Settings.
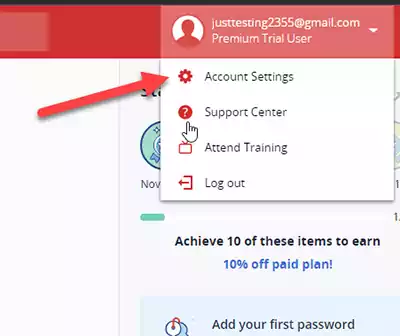
2) Select Multifactor Options.
Select the Multifactor Options tab under the Account Settings.

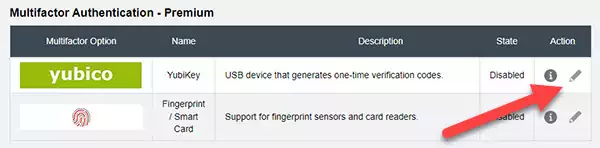
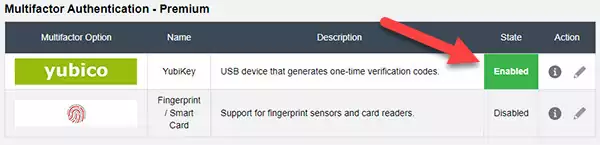
3) Find the Yubico Multifactor Option.
Press the Edit option next to the Yubico Multifactor option.
4) Enable the YubiKey option.
Change the value next to the Enable option to yes using the dropdown field.
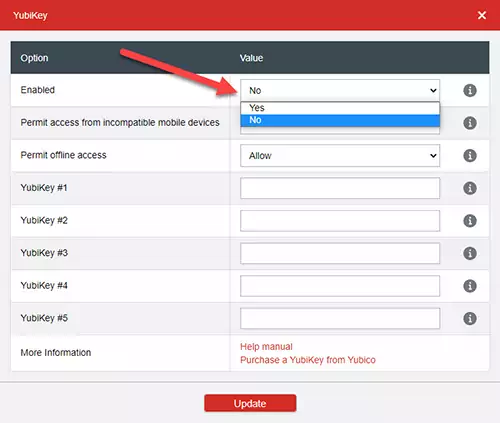
5) Register the first YubiKey.
Insert your YubiKey into the free port on your computer.
Click inside the first field labeled YubiKey #1 and press the touch bar on your YubiKey until the text field gets filled with data. You may need to hold it for a few seconds.
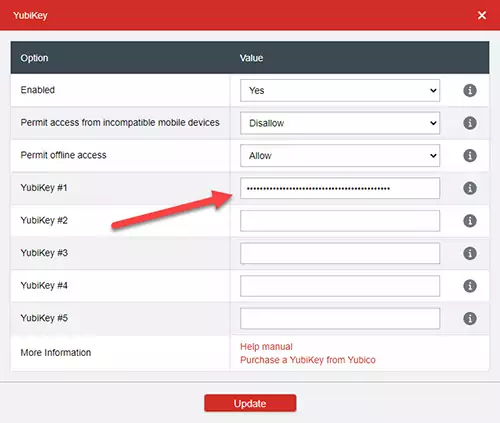
If you like to stop here, that’s all you have to do. You can now press Update and confirm the change by typing your Master Password.
Close the form, log out and log back in using your credentials and a YubiKey, which you just configured.
However, I suggest you register a second key as a backup option if you lose or break the primary key. So this is what we are going to do next.
6) Register the second YubiKey as a backup.
Remove the first key and insert your spare one.
Next, click inside the second field labeled YubiKey #2 and press the touch bar on your spare YubiKey until the field fills with data. You may need to hold it for a few seconds.
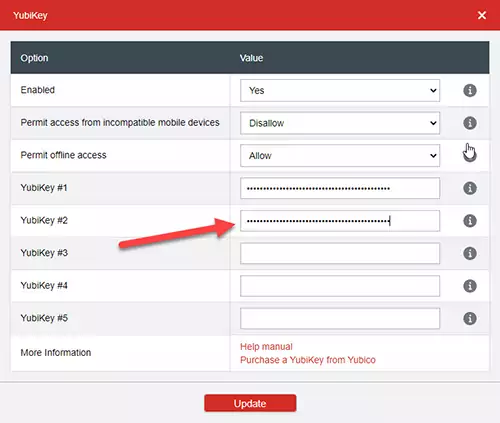
You can now finish the process by pressing the Update button at the bottom of the form. Next time you will have to use your YubiKey and your credentials to log in to LastPass.
Setting the 1Password account to work with YubiKey.
As you may already know, the 1Password is my favorite Password Manager, which I have been using for over three years. However, although 1Password can work with YubiKey, it does so only for the online account. Therefore, you will have to type only your master password when using the browser extension.
Nevertheless, I have decided to include 1Password as I think this is still the best Password Manager currently available. You can try 1Password for FREE for 14 days to see if this is the Password Manager you were looking for.
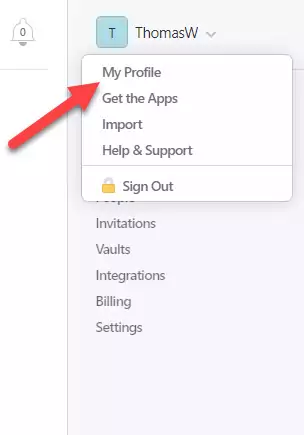
1) Log in to your 1Password.com account.
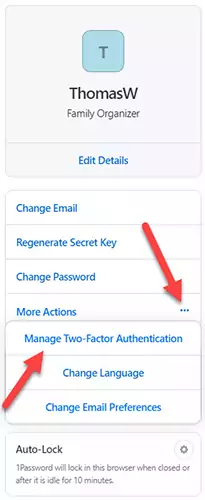
Expand the menu by pressing your account name and selecting My Profile.
2) Select More Actions under My Profile.
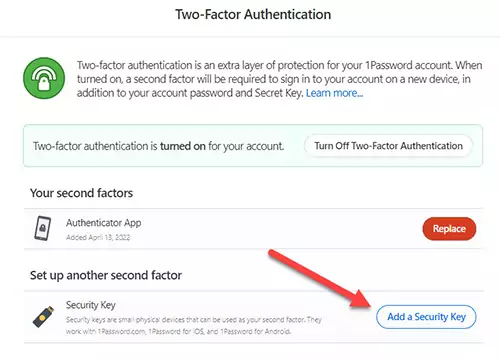
On the left-hand side, select More Actions, followed by Manage Two-Factor Authentication.
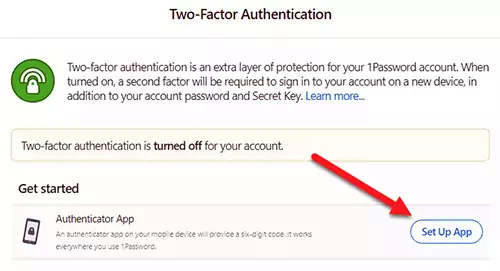
3) Press the Set Up App button.
You may notice that there is no YubiKey option available under the Two-Factor Authentication section in 1Password. The option to set up YubiKey remains hidden until we finish setting up an alternative 2FA method using either 1Password or your favorite authenticator app.
You can now use your 1Password extension to scan the QR code or use your favorite Authenticator app like Google or Microsoft Authenticator.
If you don’t know how to use 1Password to scan the QR code, I will recommend reading one of my other posts where I have explained how to add a 2FA code to 1Password.
You may also like: 1Password – Tips and Tricks for everyday use.
Alternatively, please read my post on how to add a 2FA account to Google Authenticator.

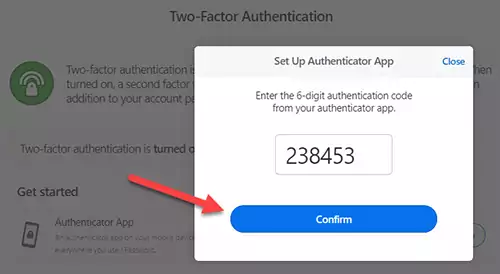
Press the Next button to confirm the 6-digit code generated by the app.
4) Press Next to confirm the 6-Digit Code.
If you have used 1Password to scan the QR code, click inside the text field and let 1Password populate the 6-digit code. Otherwise, type the code generated by the authenticator app.
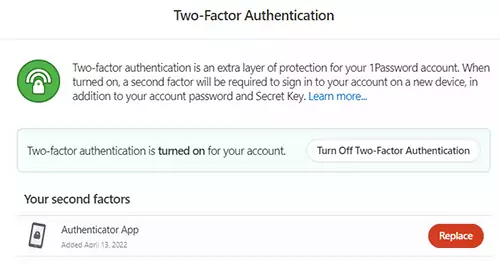
5) Reload the page and sign in again.
We now have to reload the page for the option to add YubiKey to 1Password to appear.
You can also click a different section on the page and then return to the Two-Factor Authentication section again. But I think reloading the page is faster.
6) Press Add a Security Key and give it a name.
Again, I would suggest registering at least two YubiKeys, one of which will be your daily driver and another one as a backup that you will keep at your home in a safe location.
Name your security key; I always type YubiKey1 and press Next.
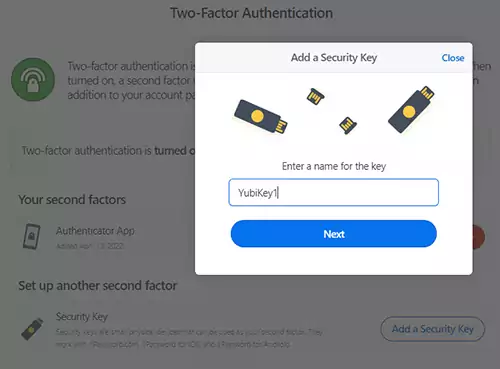
Follow the instructions on the screen to register your YubiKey in 1Password.

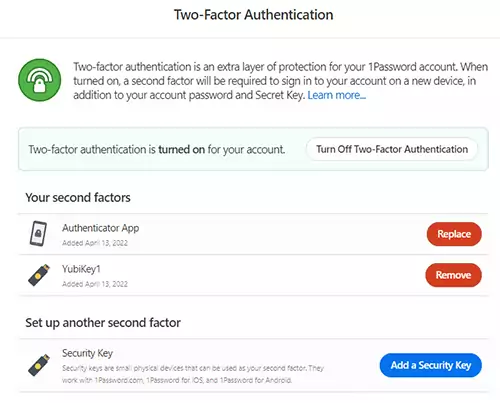
You can now repeat the steps to add a second security key as a backup option. With a spare YubiKey, you can still log in if your primary key is lost or damaged.
The spare YubiKey is not a necessity, though. Keep in mind that you still have the other 2FA method to fall into using your Google Authenticator if you don’t have access to your primary key.
After completing this process, your 1Password.com online account will be protected by the YubiKey. However, you will still use only your master password to unlock the app installed on your computer or biometrics on a mobile device.
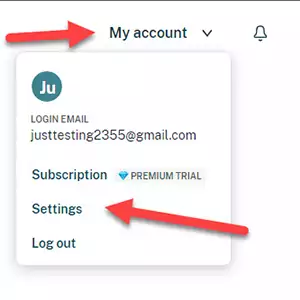
Setting Dashlane to work with YubiKey.
Similar to other Password Managers, Dashlane can be configured to require a YubiKey when using the browser extension. Make sure to try Dashlane before deciding which Password Manager is for you.
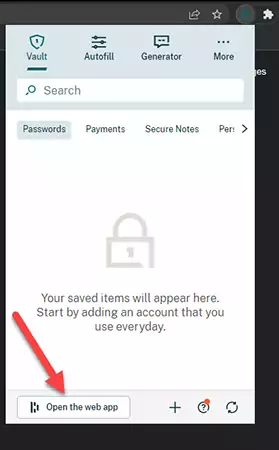
1) Log in using the Dashlane browser extension.
Expand the Dashlane browser extension and press Open the web app to open the online version of the app.
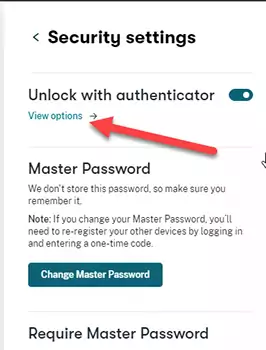
2) Open the Security Settings.
Expand the My Account menu and select Settings, followed by the Security Settings option.
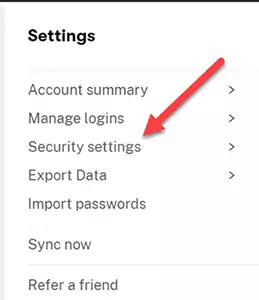
3) Adding YubiKey to Dashlane.
Toggle the button next to the Unlock with authenticator option to enable the authentication using YubiKey. You may need to confirm the change by retyping your master password.

In my opinion, the description of this option is confusing. At first, I thought that this option was for setting up 2FA using one of the authenticator apps like Google Authenticator. I was wrong, though, and it is to set up the Security Key like YubiKey.
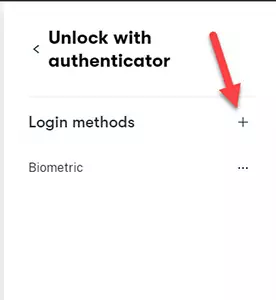
Press the Add hardware key and follow the instruction on the screen.
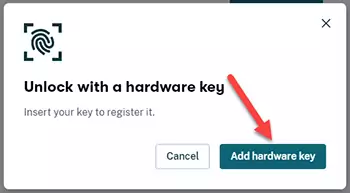
Finally, press Done to complete the process.
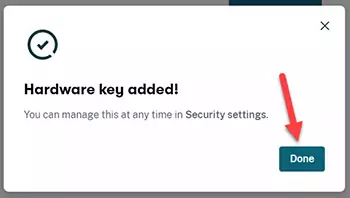
You can also add a spare key by pressing the View Options link followed by a plus sign.
Setting Bitwarden to work with YubiKey.
Adding YubiKey to Bitwarden can only be done via the online account, and you have to be a premium user.
1) Log in to your Bitwarden online account.
Press Settings followed by the Two-Step Login option.
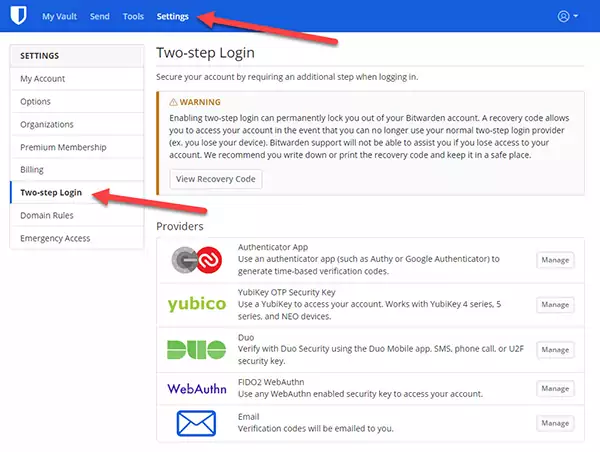
2) Adding YubiKey to Bitwarden.
Under the Two-Step Login section, press Manage next to the WebAuthn icon.
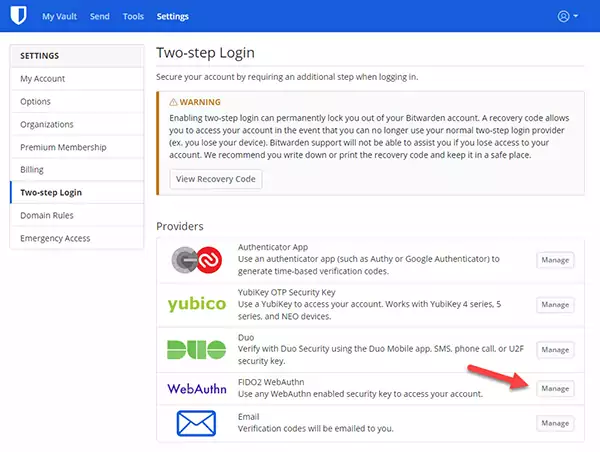
You may need to confirm the Master Password to open the TwoStep Login form.
3) Setting up Two-Step Login FIDO2 WebAuthn.
Make sure to read the warning message. The Bitwarden suggests setting up an alternative 2FA method along with the YubiKey in case the platform you are using does not support the FIDO UTF protocol.
For example, you can set up 2FA using the Google authenticator to authenticate and access the Bitwarden vaults when you cant use the YubiKey.
Type the Name for your YubiKey; YubiKey1, for example, if you like to add another spare one later.
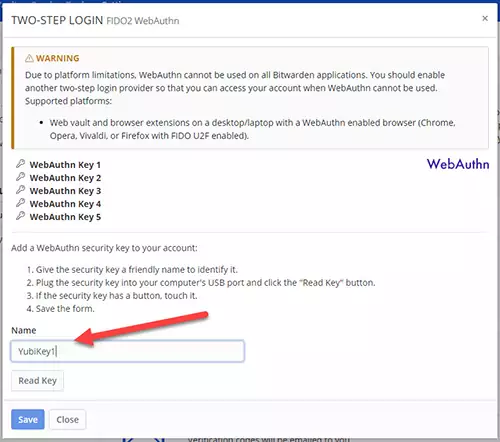
Press the Read Key button and follow the instruction on the screen.
Finally, confirm the setup by pressing the Save button.
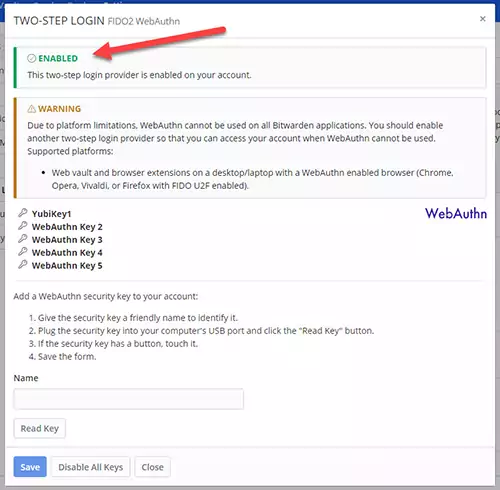
At that point, you can add another YubiKey as a backup. Otherwise, press Close to complete the process.
Setting Keeper to work with YubiKey.
Like any other Password Managers in this post, Keeper can also work with YubiKey.
1) Open the Keeper desktop app and log in.
Select your account name and press the Settings option to open the settings window.
2) Select the Security option.
As with many other Password Managers, the Keeper enforces the rule of having an alternative 2FA method enabled first before adding the YubiKey. The idea is that if you try to use Keeper on a platform that does not support the FIDO UTF technology, you can always log in using the alternative method.

In this case, the Keeper suggests configuring the Two-Factor Authentication method using one of the popular authenticator apps like Google Authenticator or Duo before setting up the YubiKey.
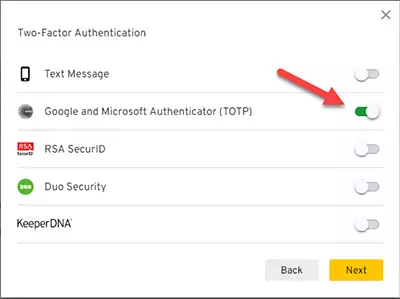
3) Enable Two-Factor Authentication.
After toggling the Two-Factor Authentication switch, disable the Text Message option as it is widely considered insecure and enable the option labeled Google and Microsoft Authenticator (TOTP).
Press Next and scan the QR code generated by the Keeper using either Google or Microsoft Authenticator app. You can read my other post on adding an account to the Google Authenticator app if you have never done it before.
You may also like: Should I use Two-Factor Authentication?
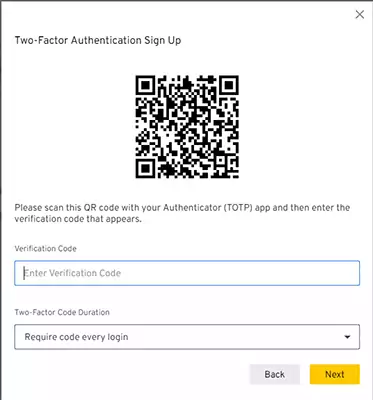
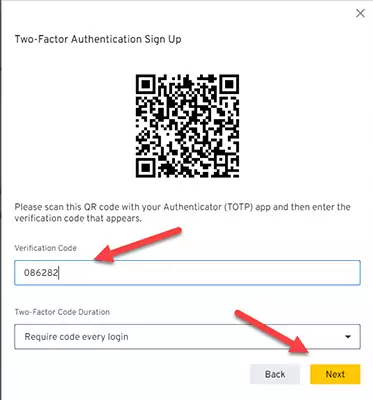
Paste or type the code generated by the authenticator app in the text field labeled Verification Code and press Next.
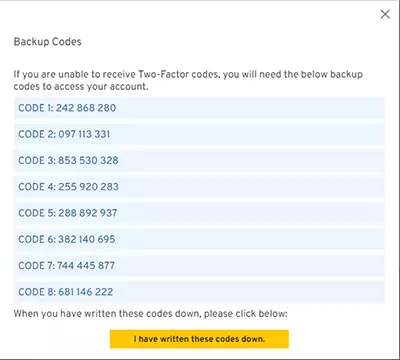
4) Save the Keeper Backup Codes.
You can now save the Backup Codes generated by the application. Each backup code can only be used once and is intended as an emergency login if you have lost your phone with Google Authenticator.
Make sure to copy the codes, print them out and keep them in a safe place in your home.
Finally, press the I have written these codes down button to complete the process.
5) Adding YubiKey to Keeper.
Now that we have configured an alternative 2FA authentication method, we can finally add the YubiKey Security Key to Keeper.
Press the Setup button next to the Security Key option.

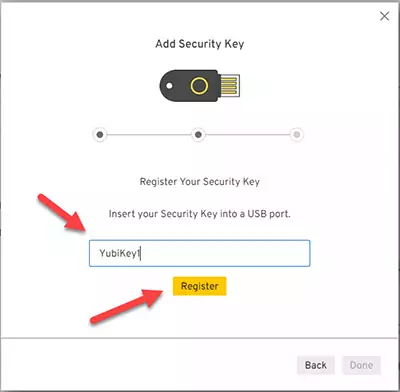
Remove your security key from the USB port and press Next.
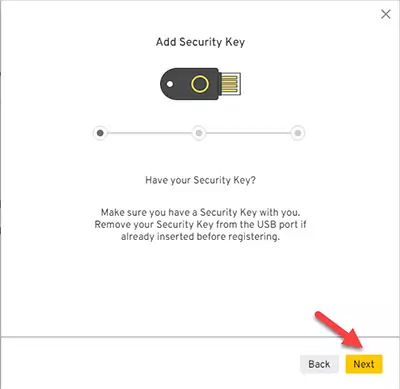
Insert your YubiKey and give it a name; I like to name it YubiKey1 so I can add another one as a backup.
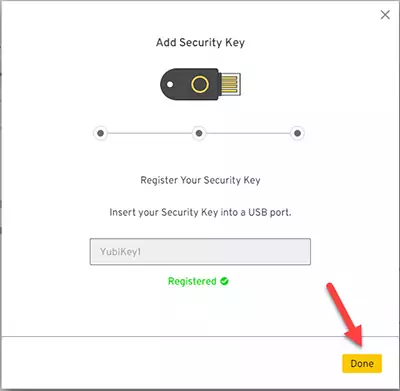
Press the Register to register your YubiKey and follow the instructions on the screen.
Finally, press Done to finish the process.
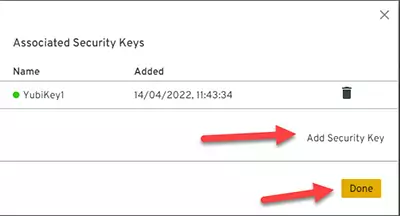
You can now add a spare YubiKey to Keeper as a backup option; otherwise, press Done again to close the window.
Hopefully, this article will help you add the YubiKey to your favorite Password Manager.