
The Nordpass Password Manager is one of many Password Managers offering Multi-Factor Authentication, including a Physical Hardware key like YubiKey.
Press Account Settings in the Nordpass application installed on your computer and enable Multi-Factor Authentication (MFA). Confirm your password and press Setup under the Security Key option. Follow the Warning message on the screen and set up the Authenticator app first as a fallback if you lose your YubiKey. Once set, press the Setup Security Key option again. Type your PIN and press Next. You may need to touch your YubiKey to register and give it a name.
In recent years, Multi-Factor Authentication spread like wildfire and quickly became a norm for securing any service or account where user login is required. As a result, we are no longer satisfied with having our data hidden behind a single password, no matter how difficult it is to guess.
You may also like: Should I buy YubiKey Security Key?
If you are considering using your YubiKey with Nordpass, then you are in the right place. I will guide you through setting up your Security Key with Nordpass, including a few crucial tips that will reduce the risk of losing access to your accounts after losing your YubiKey.
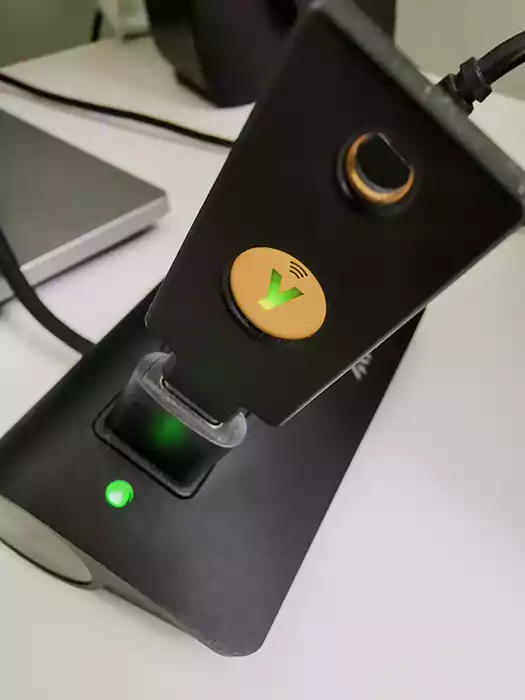
Spare YubiKey and the Authenticator app.
Make sure to have your YubiKey ready, including a spare one.
Although you don’t need a spare YubiKey, please consider getting one.
Having a spare YubiKey will save you a lot of frustration, ensuring that you will still be able to access your critical accounts and services even if you lose your primary YubiKey.
Think of your YubiKey as you would any other key.
Yubico
I would recommend my personal favorite YubiKey 5C NFC, a very versatile Security Key with the latest USB-C and NFC technology, allowing you to use it with your NFC-enabled devices just by tapping it.
If you are an Apple user, the YubiKey 5Ci is the best next choice, in my opinion. Although it lacks NFC connectivity, it has a dual connector with support for USB-C and Lightning.
Of course, you can also check the whole range of YubiKeys on the Yubico website and pick the one which suits you best.
Having the preparation done, let’s move on and set up the Nordpass Password Manager to work with your YubiKey.
Adding YubiKey to Nordpass.
The Nordpass Password Manager Multi-Factor Authentication (MFA) offers two types of Two-Factor Authentication (2FA).
You may also like: Should I use Two-Factor Authentication?
- Using an Authenticator app: Microsoft Authenticator, Google Authenticator or Authy for example.
- Security Key: YubiKey or any other compatible Security Key.
I will set both an Authenticator app and the Security Key during the configuration. Setting up the Authenticator app before adding a YubiKey is recommended by Nordpass as an insurance policy in case the authentication using YubiKey fails due to connection issues.
Which authenticator app you use is entirely up to you, but if you are unsure which one to choose, I have compared Google Authenticator and Microsoft Authenticator, highlighting the differences and benefits each application offers.
You may also like: How to add an Account to Google Authenticator?
You can initiate the process of adding the YubiKey to the NordPass in your client installed on your machine. The process will then continue in the browser under your online account.
1) Open the NordPass client on your computer and press Settings.
You can go to step 4 if you have your NordPass online account already open in the browser.
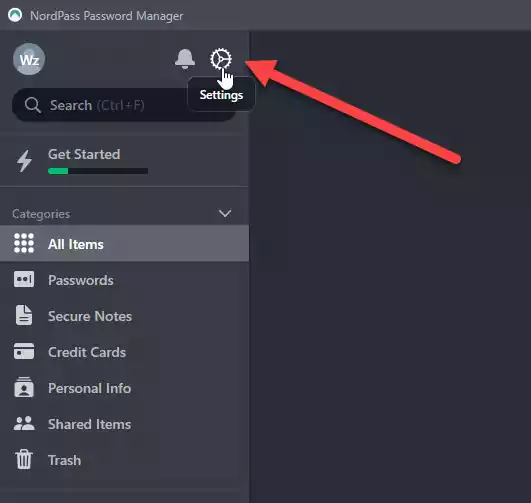
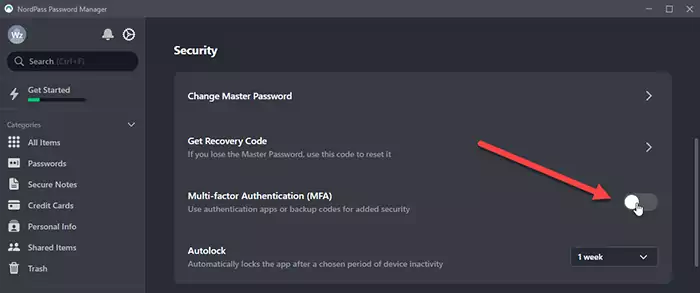
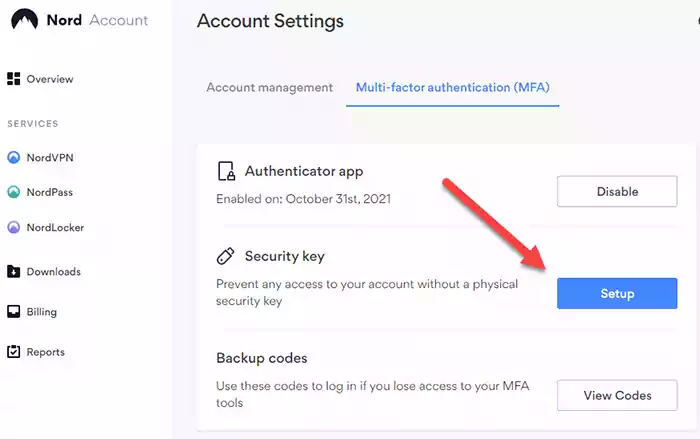
2) Enable Multi-Factor Authentication (MFA).
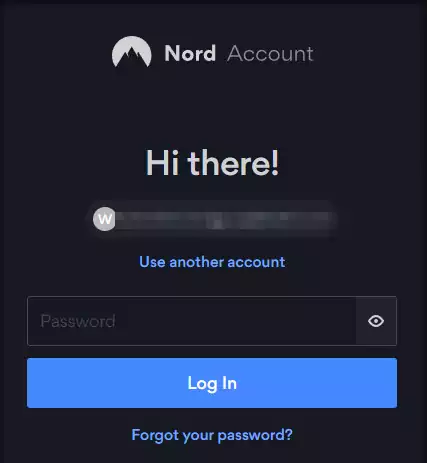
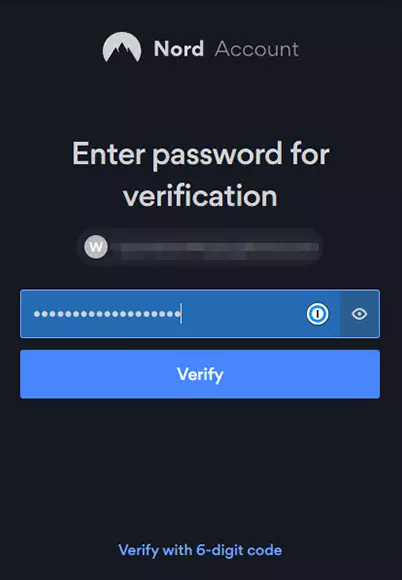
3) log in to your Nord account.
The process will now continue in the browser.
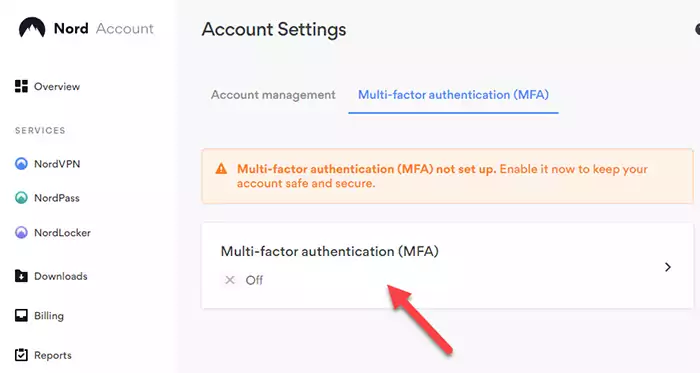
4) Enable Multi-Factor Authentication (MFA) in your Nord account.
5) Type your password to verify Nord account ownership.
6) Press Setup under the Security Key option to add your YoubiKey.
I don’t have to do this in that order, as I will set up the Authenticator app first, as recommended by the NordPass.
I just wanted to show you the warning message prompting me to configure the Authentication app first.
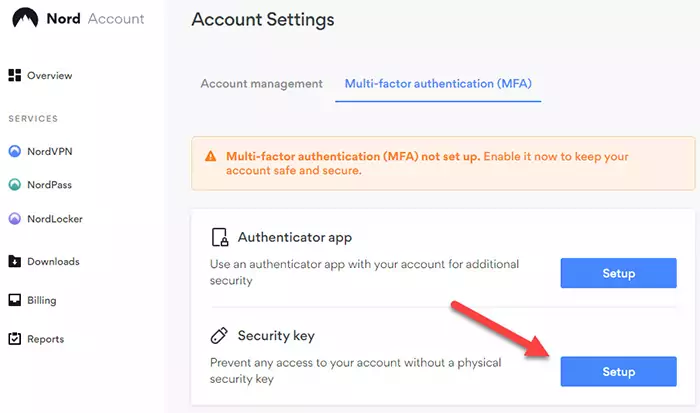
7) Configure the Authenticator app first before setting up the Security Key on your Nord account.
An attempt to set up the YubiKey before configuring the Authenticator app triggers the warning message explaining that the Authenticator app should be configured first as a backup if the Security Key cannot be used due to connection problems.
At that stage, the decision is yours.
You can ignore the message and press Proceed with the security key, or you can set up the Authenticator app first.
You may also like: Secure Your Coinbase account with YubiKey – A Complete Guide.
If you made the right decision and purchased a spare YubiKey, the chances of losing both are slim to none. However, I like to have peace of mind that in the improbable scenario of losing both of my security keys, I will still be able to access the Nord account using my Authenticator app 2fa codes.
In this case, I’m more than happy to have a backup option, and I will proceed with setting up the Authenticator app first.
Suppose you don’t want to have a backup in the form of the Authenticator app. In that case, you can skip this section and go to step 12, where I am adding my primary Security Key after configuring the Authenticator app.

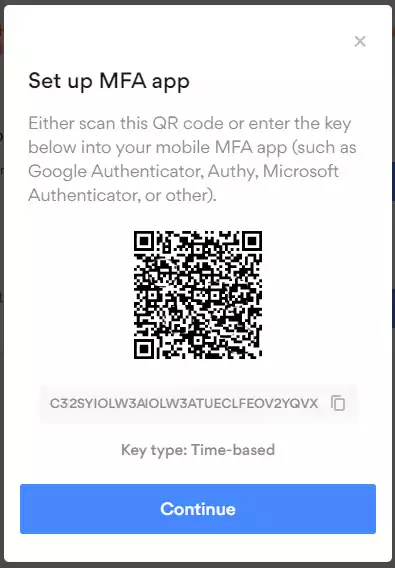
8) Scan the QR code using your authenticator app.
If you proceeded by configuring your authenticator app first, now is the time to scan the QR code displayed on the screen.
What I like to do at that stage is to go even further and either save the copy of the QR code or, even better, keep the Secret Key displayed beneath the QR code.
Having a Secret Key is very useful as it allows you to create the code again in case your phone with Google Authenticator was lost or stolen.
You may also like: How to add an Account to Google Authenticator?
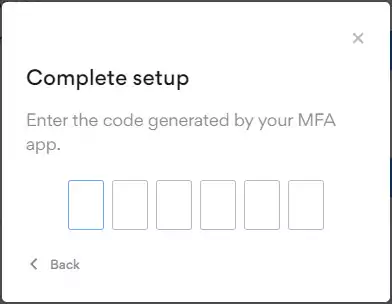
9) Confirm the code generated by your Authenticator app and press continue.
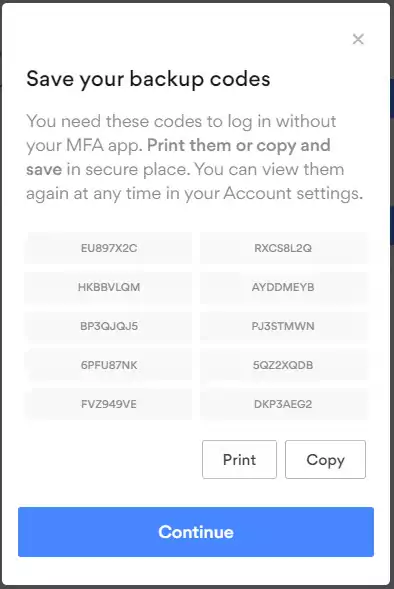
10) Save the Backup Codes for your NordPass account.
The Backup Codes are another form of authentication, and you must save them in a safe place.
The Backup Codes are intended to be used only once when you can’t access your authenticator app.
Single Backup code can only be used once, and new Backup codes must be generated if you use them all.
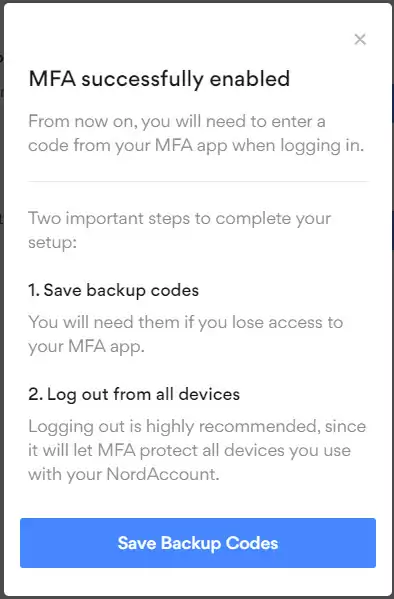
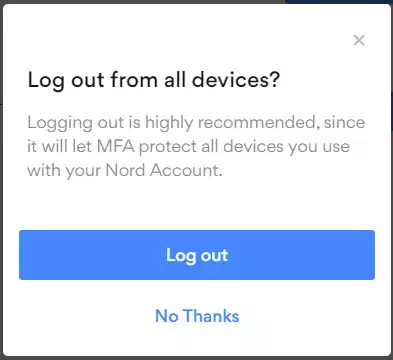
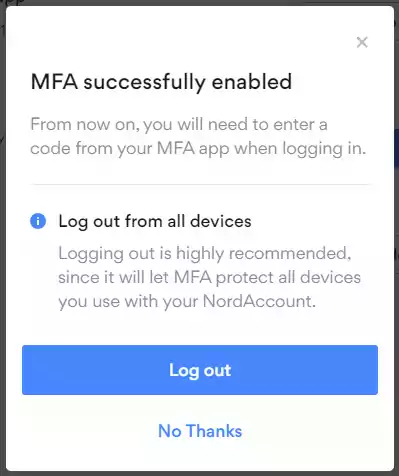
11) Log out from all devices.
Make sure to log out from all devices to apply the additional authentication step you just configured.
Next time you try to log in, you will be asked to authenticate using your authenticator application.
12) Adding Security Key to the NordPass.
After setting up the Authenticator app, I will finally add the YubiKey to my NordPass account.
Press Setup under the Security Key section to continue.
Make sure to have your YubiKey ready.
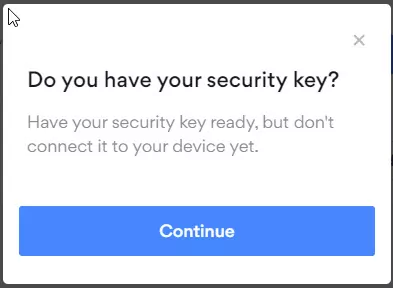
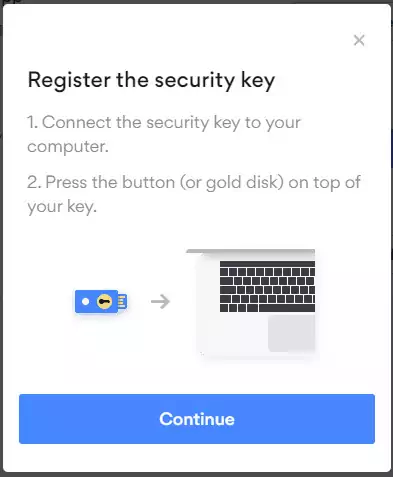
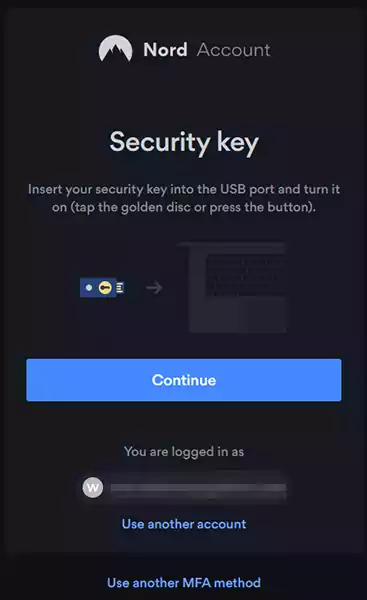
13) Register the Security Key.
Insert your YubiKey to the free USB port and press Continue.
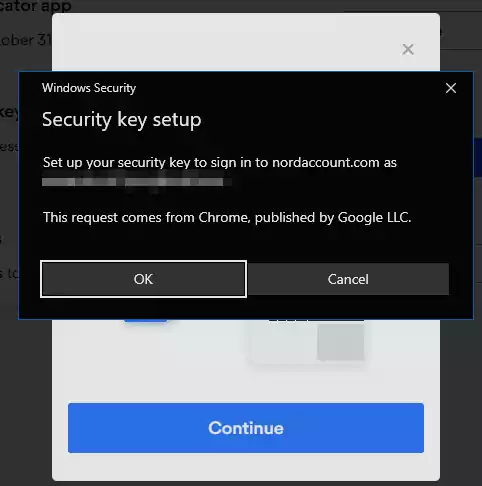
14) Press OK on the Windows Security dialog to continue.
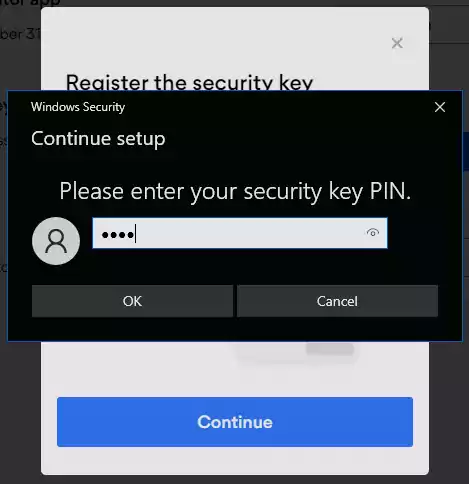
15) Confirm the Security Key PIN.
Type your YubiKey PIN if you have configured one.
Otherwise, press continue.
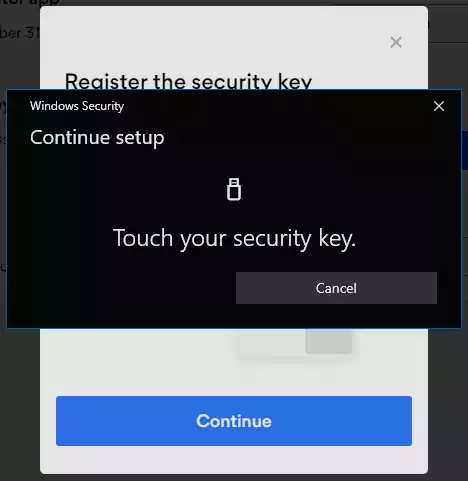
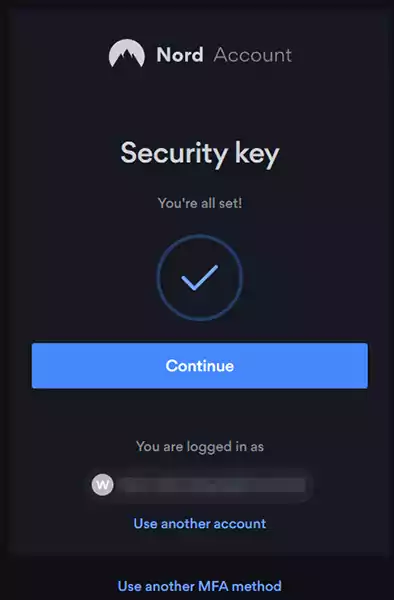
16) Touch your Security Key to continue the setup.
At that stage, your YubiKey golden disk should start flashing yellow.
Touch the disk to continue the setup.
17) Give your YubiKey a name.
It is a good idea to name your YubiKey.
As I’m going to add my spare YubiKey, I will name this one YubiKey1.

18) Log out from all devices.
When you press Log out, your browser session may become unresponsive.
Just press the refresh button in the browser and log in using your password and the YubiKey.

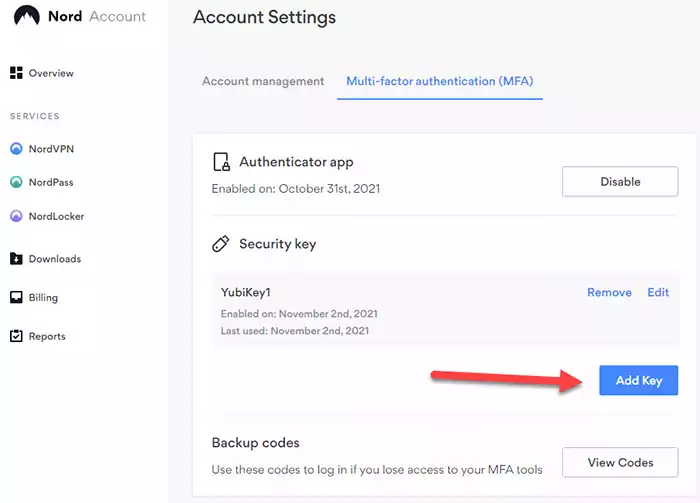
Adding your spare YubiKey.
If you decided to buy a spare YubiKey, now it’s time to add that one to your account.
The process is much easier this time, and you just have to press Add Key and follow the instructions.
Remember to give it a unique name like YubiKey2 or SpareYubiKey, for example.
Summary.
Hopefully, you now have your Nord account secured with the Security Key. If you have also configured the Authenticator app, you can always use that instead.